Friday, November 11, 2011

pork fried rice.

Guess what I get to do this weekend? I get to cook dinner for more than two people!! Tonight I'm making BBQ on a Bun (family recipe that is similar to sloppy joes) for two of our friends that are coming over for dinner, and Sunday we're having FOUR people over for dinner! D will be making traditional spaghetti sauce and meatballs, and when I get home from work I am thinking about making an alfredo sauce as a second alternative. We are also going to have two different types of pasta, so it will be a mini pasta bar!

So what do I have for you today? Pork fried rice! D tried Chinese food for the first time a few months ago (I know... first time!?), and he has decided that he loves pork fried rice. So I did what anyone would do- tried to make my own version at home!

This was probably the 4th time I've made it, and I think I have it down now, so I will share it with you! Remember, you could use chicken or shrimp instead, and add more veggies/spices. This is just a basic recipe that you can tweak to your own liking!

So, that being said, this week we have had Pork Fried Rice AND Beef Stew. Let's just say that D is in heaven (And he went back for seconds- or thirds- of each!). I plan on giving you all my beef stew recipe next week- so keep a look out! ;)


Pork Fried Rice

2-3 thin-cut boneless pork chops, fat removed and diced fairly small
2 cups cooked white rice (prepared using box directions)
1/2 package frozen mixed carrots and peas (the kind that you can steam in the microwave), cooked
3 eggs
soy sauce
sesame oil
olive oil
1/2 tsp onion powder
1/2 tsp garlic powder
salt and pepper to taste

In a wok (or large pan), heat a little olive oil. Add the three eggs and scramble, cooking until done. Remove the eggs from the pan and set aside in a small bowl for later. Next, add a little more olive oil to the pan. Next add the pork and cook until completely done. As the pork is cooking, season with a little salt, pepper, and the onion and garlic powder. The 1/2 tsp's are just estimates, I simply shook a little of each onto the pork.

Once the pork is done, add the white rice and veggies. This is when I add the soysauce. Using the little hole on the top of the soy sauce bottle, I simply pour soy sauce onto the pile of rice until it turns brownish, stir, taste, add more soy sauce if needed, stir, etc. Just make sure you taste as you go because you don't want it to be TOO salty. Remember, you can always add more if needed, you can't take it away. At the last minute, add the eggs back into the rice. Serve hot! I like to add a little hot sauce to my plate ;) Enjoy!

Wednesday, November 9, 2011

three cheese and bean quesadillas.

Remember the other day (okay, over a week ago..) when I made quesadillas at home for the first time? Well.... I'm kind of in love with it. They are so, so, so easy to make!

And don't get me wrong, I love me some PB&J (my parents made homemade grape jelly this year.. lets just say next year, I will be participating... and making sure that I get to take at least 10 jars home with me.), but sometimes a hot, cheesy quesadilla just sounds like heaven. You know?

So I think you should save those extra tortilla shells from Taco night and make quesadillas the next day. I know. I'm full of good ideas.

Now I'm not going to sit here and tell you that this is a "recipe", because it's really not. Just add whatever you want! Cooked chicken, pork, steak, hamburger... anything you have leftover will work! This time, I'm going to show you how to make three cheese and bean quesadillas.

First, spray a large pan (big enough for whatever size quesadillas you have) with cooking spray and turn on the heat to about medium. Put a tortilla in the pan and put your first cheese in!

My first cheese was some swiss that I had leftover from sandwiches:

Then add your next cheese. Mine was some shredded sharp cheese that I had leftover from making Chicken Curry.

And finally, add your last cheese. Mine was some mexican blend that was leftover from Tacos. See a pattern here? Use what you've got!


Next, I added some pinto beans that were leftover from last week when I made chicken quesadillas. I just poured all the extras into a tupperware container and kept them in the fridge. Perfect!


And the last thing that I added was some smooth taco sauce. The only other thing that I would have added if I had some is tomatoes diced up. I love tomatoes!


 Let it cook until you lift up the edge (with a spatula!) and see that it is toasty brown and delicious (to your liking). Simply remove it from the pan with a spatula, put it on a big plate, and cut it into 4 pieces! I used a pizza cutter for this. It worked perfectly!


Mmmm. Cheesy beany melty deliciousness. Feel free to dunk in your favorite queso or salsa. :)

Adios friends, happy hump day!

Monday, November 7, 2011

oatmeal peanut butter snack squares.

Is there really anything better at keeping you full than oatmeal? I mean... I can eat a bowl of oatmeal at 9am and be good until mid-afternoon. No joke.


So these "snack squares"? They're really just delicious little homemade appetite suppressors. I mean, okay, obviously you shouldn't eat them in place of a meal, but as a mid-morning or mid-afternoon snack to hold you over until the next meal? Absolutely.


If I had a full time job and worked all day, I would definitely make things like this and pre-package them up on the weekends into individual baggies and then grab one every day to bring to work. Isn't it way more exciting to eat a snack at work if it's homemade?


Same goes for lunches... which would you be more excited about eating for lunch at work: a microwavable frozen dinner, or leftover homemade lasagna? Exactly. You know which one has more flavor.


Another thing (okay, two things) I love about these snack squares is that (1) they have mini chocolate chips in them (LOVE mini chocolate chips! So, so, so cute.) and (2) they introduced me to natural peanut butter. Have you tried natural peanut butter? I buy the Skippy brand, and I SWEAR, it tastes just like regular peanut butter.

And to prove it, I ran a little experiment. You see, D doesn't like "weird" things. He would love it if I would just leave well enough alone. If I were to ask him "Do you want regular peanut butter or natural peanut butter?", well... I wouldn't even ask. I know the answer to that one. Because he (and maybe you?) pictures natural peanut butter as being all dry and healthy tasting and gross. Right?

Well, I just made him a peanut butter and banana sandwich with the natural peanut butter. Guess who loved his sandwich and didn't say ONE WORD about it being "dry" or "healthy" or "weird tasting"? That's right. Sara- 1. D- 0. Now if I could only find a way to sneak beans into something...

So what I'm trying to say is... go out and buy the natural peanut butter. And not just for this recipe, for everything that you use peanut butter for. Because the ingredient list is so much better than that of the regular ol' stuff. Seriously- see for yourself! Plus the natural peanut butter has 20 less calories per serving.
peanuts, sugar, palm oil, salt. THAT'S IT!
peanuts, sugar, hydrogenated vegetable oil, salt, hydrogenated cottonseed oil.
Oh, and if you would like the recipe for these delicious guys, head on over to How Sweet It Is.

Here's the recipe.

The only thing I changed is that I used all-purpose flour instead of whole-wheat flour. They turned out great with the AP flour! But I really would love to try making them with the whole-wheat flour just for comparison purposes (plus...any excuse to make more of these is a good excuse. Trust me.). If any of you try it with whole-wheat, let me know how it goes, okay?

Friday, November 4, 2011

bean soup.

You know those dishes that warm your soul?

This is one of those dishes.


And the best part? It only requires two ingredients that you don't already have at your house: navy beans and cooked ham. The only other things that go into this recipe are water, salt, and pepper. Can it get any easier than that?

And yet it has this silky, smooth, creamy, buttery, delicious flavor that tastes like you fussed and fussed over it. Your guests/kids/friends/family/neighbors/pets will be impressed.


It also freezes really well, so if you happen to be making a big ol' (ole?) pot of it for yourself since your boyfriend INSISTS he doesn't like beans even though the only kind of beans he has ever tried is the baked variety, you can freeze half of it and eat it at your convenience. You know, as opposed to eating a big bowl of it for lunch for three days straight so that it doesn't go to waste (which um... I totally didn't do...). I make good life choices.

Oh and you know what makes this soup even better? Serving it with some fresh bread slathered with butter and dippin' away. You know you want to. Don't worry, nobody's watching.


Bean Soup

1 bag navy beans
1.5 cups precooked and diced ham
water
salt
pepper 

Sort through navy beans to ensure all pebbles and beans with brown spots are taken out. Place beans in the bottom of a large pot. Pour water over beans until the water level is about 2" above the beans. Allow beans to soak in the water for 1-2 hours, or until beans have shriveled. (The longer you let them soak, the less cooking time they will require. My grandma lets them soak overnight. I'm impatient so I let them soak for like 20 minutes and then get mad that it takes 2-3 hours to cook.)

Add more water if needed so that water level is 1-1.5" above beans. Add salt and pepper. Bring water to a boil. Add ham. Reduce heat so that it is just a simmer and cover. Stir pot every 5 minutes or so and ensure there is still enough water to allow beans to cook. The beans will absorb the water as they cook, so you will need to add HOT water throughout the cooking process. If the water level goes down and you can see the beans boiling instead of water, add water to about 1-1.5" again and bring to a boil. Add salt and pepper. Reduce heat, cover, and simmer, stirring occasionally.

Repeat above steps of adding water/ bringing to boil/ reducing heat/ simmering/ and stirring until beans are nice and tender. Add salt and pepper to taste throughout the cooking process. The skin will be peeling back and the beans will be a nice fleshy color when it's done. They should basically melt in your mouth and be completely tender when done. As they are getting very close to done, do not add any more water or your soup will be too watery. Serve hot!

Wednesday, November 2, 2011

chocolate-stuffed toffee chip cookies.

I "liked" the How Sweet It Is page on Facebook when I found Jessica's blog a few months ago. Every weekday morning when I wake up, there is always a link to her new blog post with a picture that makes my mouth water. (Seriously, even dinner foods look good at 8am when she's behind the camera)


So... I get a lot of inspiration from her. Not sure what I want to bake today? Oh, hey, Jessica just posted a to-die-for cookie. That'll do. 

So these cookies... Jessica claims they are the best cookie that she has ever created. Coming from someone who has made so so so so many delicious cookies (don't believe me? Click that link and see her "cookie" recipe page) that always get rave reviews, I knew these had to be fantastic.


Luckily for me, I already had all of the ingredients in the pantry (leftover Toffee chips from toffee chocolate chip snickerdoodles and a bag of chocolate chunks I picked up one day because they were on sale)!


I was originally planning on making double fudge oreo cookies today with Halloween Oreos, but uh... I'm out of cocoa powder. So I had to nix that plan and go with these. I'm so glad I did, because they are absolutely delicious. And fun to make!

I do have to say they are my favorite cookie I have tried from Jessica's blog, and I have tried quite a few (all being scrumptious, of course). The toffee chips give it the perfect chewy crunch and the chocolate chunks in the middle are all melty and dreamy. The brown butter that goes into the batter doesn't suck either.

Please, I beg you... just make them. Please? I promise you won't be dissapointed. Oh, and if you don't happen to have chocolate chunks.. just chop up a chocolate bar! (I'm sure you have one leftover from Halloween, don't you?)


Chocolate-stuffed Toffee Chip Cookies
Recipe from How Sweet It Is

1 1/2 sticks (12 tablespoons) unsalted butter
1 cup brown sugar
1/2 cup sugar
1 egg + 1 egg yolk, at room temperature
2 tsp vanilla
2 cups + 2 tablespoons all-purpose flour
1/2 tsp baking soda
1/4 tsp salt 
1 cup toffee chips
chocolate chunks, baking squares, or chocolate bars cut into pieces (I put 3 chunks into each cookie)
Heat a small saucepan over medium-low heat and add butter. Whisk until butter melts, then continue to stir and whisk just until tiny brown bits appear at the bottom of the pan. Remove from heat immediately as the butter can burn very quickly. Set aside and let cool for about 10-15 minutes, until the butter comes to room temperature.

Once butter has cooled, add to a large bowl. Whisk together with sugars until smooth, then add in the egg and egg yolk. Mix again until combined, then add in vanilla extract and mix. Add in flour, baking and soda and salt, and mix with a spoon until a dough forms. The dough may be crumbly but continue to mix – even using your hands if needed – until it comes together. Fold in toffee chips.

Roll about 1 tablespoons of dough into a ball, then press some chocolate (your choice) into the middle. Top with an additional 1 tablespoons of dough, and seal the sides, rolling the dough into ball. Place on a baking sheet about 2 inches apart. Bake for 11-12 minutes, or until edges are slightly golden. Let cool for 5 minutes on the baking sheet, then gently remove with a spatula to a cooling rack.


You deserve these cookies. And a big glass of milk.

Tuesday, November 1, 2011

tuesday.

1. I finally made homemade chicken quesadillas for the first time last night. I don't know why I've been avoiding them like the plague.. they were actually super simple. And they turned out delicious! (I may or may not have had the pan a teeeeny tiny bit too hot at first and accidentally burnt the outside of D's quesadilla. Since he likes his toast to basically just be warm bread, I figured there was no way he would eat it. Well... he ate the whole thing. I guess the chicken and cheese made up for the burnt tortilla?)

2. We went to see "In Time" on Friday night. Can I just say that Justin Timberlake is one of my favorite actors? If this wasn't the case before this year, Friends with Benefits put him firmly in my top 5. Have you seen that movie? You really should. I liked it so much that if the movie theater people (?) came in and said "Hey, you guys up for round 2?" I would have been game.

3. My youngest niece, Kynlee, was a sock monkey for Halloween.


She is too dang cute.

My middle niece, Maddie, was Frankie Stein from Monster High.


Google "Monster High Frankie Stein". I did, and it turns out its a doll. And she looks just like it! :)

My oldest niece, Taylor, was the joker.


The fact that I remember holding her as a baby makes me feel old.

4. One of my siblings needs to have a son. (Refer to #3)

5. I went to a Halloween Party on Saturday night and watched Paranormal Activity, except the music was so loud that we couldn't hear the movie and had to just kind of guess what was going on. Turns out, scary movies have zero scare factor when you can't hear them.

6. I wanted to dress up for aforementioned Halloween Party, but D didn't want to dress up and he said he would not associate with me if I wore a jersey with "Ceiling" written on a piece of paper and taped over the team's name and told people that I was a Ceiling Fan. Next year, next year.

7. Now that it's after Halloween and there isn't really any such thing as "Thanksgiving music", I'm really fighting the urge to listen to Christmas music. D hates Christmas music, but I love it. Sometimes a song will come on the radio and D will change the station and say "it sounded too christmas-y." Man, what a scrooge!

8. I fully plan to play Christmas music from about November 24th - December 25th (if I can hold off until then!) during all of the following activities: baking, cleaning, doing homework, showering, wrapping presents, decorating, and basically anything that doesn't involve sleeping.

9. I will have to bake plenty of Christmas cookies for D if I want to get away with #8.

Happy Tuesday! I'll be back with cookies for you tomorrow ;)

Monday, October 31, 2011

bookmark monday.

Hey guys! I got out of work late Friday night, went to the movies, worked all day Saturday, went to my parents for dinner, went to a Halloween party, worked all day Sunday, and came home to do massive amounts of homework for 5 hours while wrapped in a blanket, wearing a hat and gloves, and sipping hot cocoa (out of a disney princess mug, of course). Whew. THAT was a sentence.

What's my point? My point is... anywhere in that run-on sentence, does it say "made cookies!" or "cooked dinner!" ? No? Well, that's because the only action my kitchen has seen is the occasional microwaving of hot beverages and possibly D making spaghettios. That boy's obsessed.

So in lieu of a recipe today (sorry!), I'm going to make your mouth water by showing you what I've bookmarked lately that I haven't gotten around to trying out.


Happy Monday, friends!

Friday, October 28, 2011

pulled pork.

Can we talk about beer for a second? I used to d.e.s.p.i.s.e. it. As in, couldn't even drink half a can. I would have my go-to Smirnoff or fruity mixed drink (hello amaretto sour) while everyone else had beer like normal people. I couldn't see how my opinion of beer could ever change, but I kept on trying it here and there just for kicks.

And you know what? I came around. I can finally see what everyone else sees in beer. I mean, so what if the beer I like is probably the least beer-tasting beer there is? It's still beer, ok? Jeez. Maybe eventually my taste buds will allow me to expand my beer-liking palate, but until then... I'm perfectly happy with my coors light.


Don't get me wrong, I still love me a fruity mixed drink (and would choose one over beer 95% of the time), but all I'm saying is that now I can drink a beer without wanting to spit it out. That's progress, right?

Now that I've gone off on a tangent and probably bored you all to death, let me get to the point of this rambling monologue. I got this recipe for pulled pork from D's mom, and it's a winner. The original recipe calls for water instead of beer, and it's beyond delicious. So if you don't have any beer laying around, definitely still make this pulled pork. Don't go out and buy a 6-pack just to make this... unless you have other plans for the rest of the beer! ;)


Pulled Pork with Beer
1 center cut pork roast (mine was a little under 2 lbs)
1/2 cup beer (or water)
garlic powder
onion powder
salt & pepper
Your favorite barbeque sauce (I use Sweet Baby Ray's)

Season the outside of the pork roast with garlic powder, onion powder, salt and pepper. Place in crock pot. Pour beer (or water) into the crock pot. Place lid on the crock pot and cook on high for 2 hours and then on low for 6-7 hours.

Remove pork roast (and clean out the crock pot) and shred in a large bowl with two forks. Add as much BBQ sauce as you like (D likes it kind of dry, so I just add a little extra BBQ sauce to my sandwich!), mix until combined, and put back into the crock pot. Allow to cook for another 30-45 minutes. (Now is the perfect time to prep side dishes!) 

Photo Tutorial:
Fresh out of the crock pot!

Shredded...

Add the BBQ sauce...

Done! Now it just has to go back in the crock pot for 30-45 minutes to warm up and incorporate!

Thursday, October 27, 2011

chicken pot pie.

You know those individual sized chicken pot pies that you can buy at the store and heat up in your microwave? Well.... this is better. Promise. And guys, I don't take promises lightly.


This is D's favorite meal. Hands down. He eats half of the pie every time I make it and swears that he could eat the whole thing if I let him. I say his eyes are bigger than his stomach.

I also made this pie one time for a couple of my friends, and the next time they came over for dinner they requested I make it again. They didn't want any of my other recipes that I swore up and down were delicious. All they wanted was chicken pot pie.

I guess I can't blame them. This recipe is from my mom, and I remember eating it 1-2 times a month for my entire childhood. This is the dish my brother always picked for his birthday dinner. It's birthday dinner material.

** I actually only used 2 of the chicken breasts for this. The other 2 were for Chicken Tacos the next night!

Speaking of birthday dinners, a certain someone's birthday is coming up in a few weeks.. and I wouldn't be surprised if he requested this. But of course D will also request a birthday dinner at his parents house so that he can have his other favorite dinner, Chicken Parmesan. He's a birthday double dipper. But who isn't? It's not a birthday, it's a birthweek. Didn't you know?

Just make this. Tonight. And D wouldn't object to getting leftovers in the mail.


Chicken Pot Pie

2 cups cooked and diced boneless, skinless chicken breast (about a pound or 2 breasts)
2 cans cream of potato soup
1 can veg-all (or mixed vegetables) drained
1/2 cup milk
1/2 tsp thyme
1/4 tsp black pepper
2 pie crusts (1 package)
1 egg, beaten

Preheat oven to 375 degrees. Combine first 6 ingredients in a large bowl. Spoon into prepared pie crust (no need to grease the pie plate). Cover with top crust. Press down onto first crust with fingers to seal, cut off extra crust with a knife, then seal edges of crust with a fork. Brush pie with beaten egg. Slit top of crust 2-3 times with a knife. Bake for 40 minutes. Cool for 10-20 minutes before cutting. 

Photo Tutorial:

Only thing missing is the chicken...
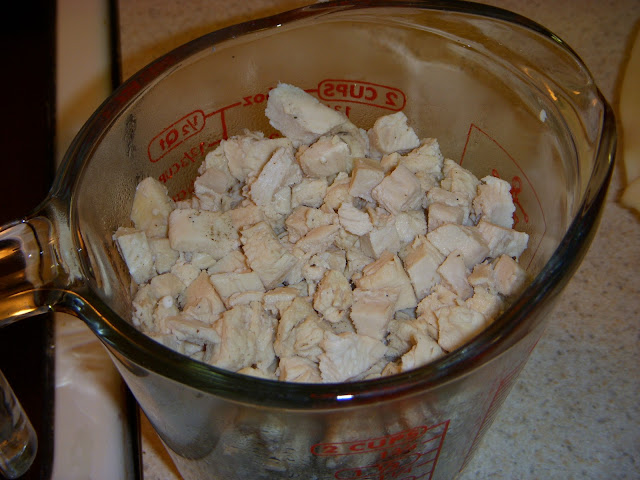
Cutting up the chicken...
2 cups!
The chicken was added to the other 5 ingredients in the bowl (1st picture) and then mixed! Now time to pour..

Into the pie crust! And spread out evenly.

Then add the top crust, press down on the edges to seal, then cut off the crust.

Then, using a fork, press down on the edge, and slide out toward you while keeping pressure on the fork. If you pull up instead of sliding out, it will separate the two pie crusts.

Dip the brush into the beaten egg, and paint your pie!

Add some slits to let the steam out and then throw it in the oven to cook...

Finally! After 40 minutes in the oven! Now begin the agonizing 10-20 minutes (10 if you're impatient!) of waiting...

Voila! Time to dig in!

Wednesday, October 26, 2011

what i ate wednesday.

Today I'm going to give you a peak into the life of me. I took a picture of everything I ate yesterday just for you! Don't you feel special? ;) 

Apple cider that I bought at the apple orchard on Sunday!
A leftover pulled pork sandwich from Monday night. Recipe coming soon!

 Unpictured: A big ol' plate of apple crisp! Mmmmm.

French Vanilla Cappuccino!
A Honey Crisp apple. Hands down my favorite kind of apple.
Homemade Chicken Pot Pie. Recipe coming soon!

Also, today I made funfetti cupcakes. Because they're delicious AND fun. I topped them with rainbow chip frosting because D and I freaking love that stuff. I've seen D eat it out of the container with a spoon. Not joking.

I'll be back tomorrow with either pulled pork or chicken pot pie! Ahh, a cliffhanger. Don't you just love a good cliffhanger? Yeah, me neither. Sorry about that!